

BACKGROUND
Is it possible to create a Rubiks Cuber emulator in Power Apps?
Recently a Twitter post from Mr Dang piqued my interest. It was a retweet of a tweet which showed an Excel spreadsheet with a 3D Rubiks Cube which could be rotated by using buttons around the cube. I had been looking for a new idea for a new Power Apps project and this looked ideal.
When I was about 10, I became interested in the Rubiks Cube, and spent many hours learning how to solve it in under a minute, and amazed anyone who was willing to watch me do it.
TERMINOLOGY
These are the terms used when referencing the parts of a Rubiks Cube:
Cube – the whole cube.
Face – a single face, or side of the cube.
Piece – a single piece on a face, which can be one of six colours.
APP/CODE
The “code” snippets in this post will be minimal as the full working App is in Github here.
INITIAL THOUGHTS
Ideally, the goal was to create a fully 3D rendered cube which could be rotated, and the sides moved by dragging – as here. I believe this is beyond what Power Apps can do – for now..
I wanted to use as much Power Apps core functionality as I could in the App, to display, store, and move the faces. To store the piece colours the plan was to use Collections but was unsure if the performance would be adequate – turns out it was no issue.
FIRST STEPS CREATING THE APP
Created a ‘Reset Cube’ button and code in the OnSelect to create a Collection to store the 6 faces and 9 piece colours. Also, a gallery to display the Collection data on screen.
// Create new collection and create Face 1
ClearCollect (
	CubeColours,
	{
		FaceNumber: 1,
		Piece1: 1,
		Piece2: 1,
		Piece3: 1,
		Piece4: 1,
		Piece5: 1,
		Piece6: 1,
		Piece7: 1,
		Piece8: 1,
		Piece9: 1
	}
);
// Append Face 2
Collect (
	CubeColours,
	{
		FaceNumber: 2,
		Piece1: 2,
		Piece2: 2,
etc.
Added 9 Text boxes for each of the 3 visible cube sides, and a Lookup in each Text box to show the text value from the Collection:

So far so good – we can see the values of all the pieces, and the 3 cube sides on screen (although not in a very user friendly format).
ADDING COLOUR
A Collection was created to store the colour numbers 1 to 6 with their corresponding HTML colour values. The below code was put into the ‘Reset Cube’ button for ease.
ClearCollect (
    TemplateColours,
    {
        ColourNumber: 1,
        ColourValue: "#00FF00"// Green
    },
    {
        ColourNumber: 2,
        ColourValue: "#FF0000"// Red
    },
    {
        ColourNumber: 3,
        ColourValue: "#FFFFFF"// White
    },
    {
        ColourNumber: 4,
        ColourValue: "#FF8040"// Orange
    },
    {
        ColourNumber: 5,
        ColourValue: "#FFFF00"// Yellow
    },
    {
        ColourNumber: 6,
        ColourValue: "#0000FF"// Blue
    }
);
The cube text boxes Text values were all set to “” (Blank) to clear them, and then the Fill property was changed as below to lookup the correct colour from the Collection:
ColorValue(
    LookUp(
        TemplateColours,
        ColourNumber = LookUp(
            CubeColours,
            FaceNumber = 1,
            Piece1
        ),
        ColourValue
   )
Resulting in coloured squares as below!

Adding the feature to turn the cube sides turned out to be one of the most difficult parts of this App. Once I’d drawn a sketch of the cube on paper it was a lot simpler:

This is the code to rotate the top side anti-clockwise. The code for the rest of the sides are slight variations on this.
// Store 1
Set(TempPiece1,LookUp( CubeColours, FaceNumber = 1, Piece1));
Set(TempPiece2,LookUp( CubeColours, FaceNumber = 1, Piece2));
Set(TempPiece3,LookUp( CubeColours, FaceNumber = 1, Piece3));

// Patch 1 from 4
ClearCollect(TempCubeColours, First(Filter(CubeColours,FaceNumber=4)));
Patch(CubeColours,First(Filter(CubeColours,FaceNumber=1)),
    {Piece1:First(TempCubeColours).Piece1,
        Piece2:First(TempCubeColours).Piece2,
        Piece3:First(TempCubeColours).Piece3});

// Patch 4 from 6
ClearCollect(TempCubeColours, First(Filter(CubeColours,FaceNumber=6)));
Patch(CubeColours,First(Filter(CubeColours,FaceNumber=4)),
    {Piece1:First(TempCubeColours).Piece1,
        Piece2:First(TempCubeColours).Piece2,
        Piece3:First(TempCubeColours).Piece3});

// Patch 6 from 2
ClearCollect(TempCubeColours, First(Filter(CubeColours,FaceNumber=2)));
Patch(CubeColours,First(Filter(CubeColours,FaceNumber=6)),
    {Piece1:First(TempCubeColours).Piece1,
        Piece2:First(TempCubeColours).Piece2,
        Piece3:First(TempCubeColours).Piece3});

// Patch 2 from 1 (Stored)
Patch(CubeColours,First(Filter(CubeColours,FaceNumber=2)),
    {Piece1:TempPiece1,
        Piece2:TempPiece2,
        Piece3:TempPiece3});
So, finally there is a fully working Cube which can be used, although it needs a bit of work to make it 3D.
3D CUBE
Initially I thought this would take a lot of time. There are no polygons in standard controls in Power Apps so consideration was given to each piece being made of one or more SVGs. An SVG is a scalable vector image file. For further information see Wikipedia and Matthew Devaneys blog post.
After a bit of searching online I found the perfect answer – a ready made Rubiks Cube in SVG format where I could modify the piece colours using Power Apps code. This is how the original SVG looks:

From here it was quite straightforward to change the SVG string and replace any piece colours using Lookups on the collection. I’m no expert in SVG but was able to work out that each piece polygon is a separate section in the SVG file, and has a corresponding colour value in it – see below.

By changing a colour to yellow I could see where it was on the cube as Power Apps renders SVGs in real time. Then I would simply put the lookup for the piece in the SVG code section – as below in Power Apps:

FINAL STEPS
Once this was complete proper buttons to rotate the cube were created (using SVGs from Bootstrap Icons).
Also a view of the reverse of the cube was created. This was simply a copy of the SVG, using the same technique as above mapping each piece in the SVG to it’s corresponding piece on the reverse of the cube. It took a bit of thinking to view the cube in reverse, and I ended up using a Rubiks Cube box and writing the piece numbers on it.


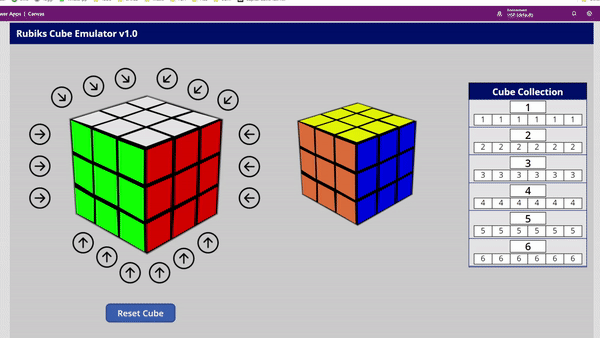
THE FINISHED APP
Here is the completed app in action:
FUTURE ENHANCEMENTS
These are some possible enhancements I’ll likely work on in the next version:
1. Animating the faces as they move. Possibly using Blender to create a 3D cube (I have experience in 3D modelling and rendering – see my Stills and Videos). Exporting each frame to SVG, adding piece colours, and then displaying it in Power Apps. There is quite a lot of work involved with this, and I’m unsure how feasible it will be to do in real time in Power Apps.
2. Solving a cube from a scrambled state. It’s unclear how this would be done but will enjoy investigating it.
3. Using a physical cube connected to the app. There is a bluetooth cube available from here. (Thanks to Andrew Rimell for spotting this).
FINAL THOUGHTS
I’m very excited for the future of Power Apps – it really is limited only by your imagination. I hope you enjoyed reading this, and look forward to any comments.
Cover Photo by Jadson Thomas from Pexels

2 thoughts on “PowerApps Rubiks Cube”